Best Apple Pie Ever

Hi Everyone!

Okay so after doing a shit tonne of baking the past few months, I’ve noticed a trend I dislike about recipe blogs – that everyone posts their life story before actually getting into the recipe. So here is the recipe, without all the fluff and filler that you don’t care about.

Also, if you aren’t a huge fan of pie (like I’m not), I can guarantee you will still love this one! If you give it a go, please tag me on Instagram (@kimberlyrose_xo)! I’d love to see your photos!

50606688_373518320114588_4939178232525094912_n

This recipe requires three parts: the pastry, the apple filling and the crumble topping. If you like you can skip the crumble topping and just make it a normal pie, but i prefer the crunch of a crumble topping. The pastry recipe makes enough for a top and bottom layer for the pie, however you can freeze the leftovers for 2 months or use it to make a quiche! (I’ll have my mini quiche recipe using this pastry up next week).

Pastry

  • 2 1/2 cups plain or all-purpose flour – plus extra for dusting/rolling (I store my flour in the freezer, I recommend doing this for an hour or 2 prior as it helps to prevent the butter from melting)
  • 225g (1 cup or 2 sticks) unsalted butter – very cold
  • 1 teaspoon salt
  • 1 teaspoon sugar – (this recipe makes an all rounder pastry that can be used in savoury or sweet pies. If you decide to use this crust for the topping as well, feel free to add more sugar. However, I highly recommend sticking to this recipe if you intend on using the crumble topping as otherwise the pie will end up being too sweet)
  • 6 – 8 tbsp ice water
  1. Mix all dry ingredients together thoroughly in a large bowl.
  2. Grate the butter – yes you read that right. It makes rubbing it into the flour 10x quicker and easier.
  3. Rub the butter into the flour mixture until it resembles sand. If the butter begins to melt, pop the bowl into the freezer for 10 minutes. If the butter ends up melting, you wont get the flaky pastry we’re looking for. You want to be able to see specks of butter throughout the dough.
  4. Add water and mix with your hands. The dough will look incredibly dry, however it should be! When it comes together when you squeeze some dough in your hand, its hydrated enough,
  5. Pour the dough out onto a clean work surface and bring together into a smooth ball. Don’t overwork the dough, otherwise it will become tough. It’s okay if the dough ball has cracks in it.
  6. Separate the dough into two disks – ensure you keep them round and flat to make rolling them out easier. Wrap in cling wrap and pop in the fridge for at least one hour (or up to 48 hours). You will only need one of these dough balls for this recipe, so feel free to pop the other one into the freezer for up to 2 months.

Filling

  • 1/2 cup caster or granulated sugar
  • 1/2 – 1 tsp ground cinnamon (depending on your preference)
  • 1/2 tsp ground mixed spice
  • 5-6 large Granny Smith apples
  • 115g (1 stick) unsalted butter
  1. Peel, core and slice the apples. I like my apples about 1/2 cm thick but you can cut them to whatever thickness you prefer.
  2. Toss apples with sugar and spices.
  3. Melt half of the butter in a wide frying pan (not a pot – this is important!) and add half of the apple mixture. Cook, on medium – high heat, stirring occasionally until the butter and sugar in the apples turn a deep golden colour. Don’t let it get too dark, as it will continue to caramelize when it bakes in the pie. Transfer to a bowl and repeat with the rest of the apples and butter. Allow to cool.

Crumble Topping

  • 1 cup plain or all-purpose flour
  • 1/2 cup packed brown sugar
  • 1 tsp ground cinnamon
  • 115g (1 stick) unsalted butter, cold and chopped (you can grate this if you like, but there isn’t that much butter to rub in. Do whatever you feel like).
  1. Mix all dry ingredients thoroughly in a medium sized bowl. Rub in the butter until the mixture resembles sand.

Putting It Together

  1. Take your dough out 15 – 20 minutes ahead of time to allow it to soften. Preheat your oven to 230 degrees celsius (450F). Grease your pie dish well with unsalted butter – don’t skip this step! Be liberal with it, you don’t want your pastry crust to stick. Place it on a well floured surface. Grab your rolling pin and give the dough a few hard whacks to thin it out a little – this makes the rolling process a lot easier.
  2. Roll your dough out into a circle, ensuring its large enough to fit your pie dish – you want a bit of overhang over the sides of the dish. Don’t worry if the dough cracks at all, this crust is very forgiving. You can easily patch any cracks up with leftover dough.
  3. I roll my dough out to the thickness of a 50c (Australian) coin – or about 1/8 inch. Roll the dough onto your rolling pin and place it into your pie dish. Press it into the dish and trim any excess.
  4. Fill with the apple mixture. Don’t worry if it looks like there’s too much liquid in the apples, it will thicken up and become a caramel while it bakes.
  5. Top with the crumble, ensuring its spread evenly over the pie. Don’t press it down! You want it to be rough as that’s how you get the crunchy bits!
  6. Pop your pie into the oven, bake at 230 degrees Celsius (450F) for 15 minutes. Reduce oven to 175 degrees Celsius (350F) and bake for 35-45 minutes, depending on your oven. The crumble should have a golden brown colour all over.
  7. Allow to cool before cutting. I know it’s super tempting to dig in straight away, however it will completely fall apart if you cut it whilst its too hot. If you have the time, refrigerate it overnight and cut into slices the next day whilst its cold, then your slices will hold together perfectly.
  8. Enjoy!

49327529_287457761942079_403022014316544000_n

If you have any questions, feel free to leave a comment below or send me a message on Instragram – @kimberlyrose_xo.

If you try this recipe, please send me photos on instragram! I’d love to see them!

Love,

Kimberly Xo

Best Ever Chewy Choc Chip Cookies

The Best Ever Chewy Choc Chip Cookies

This is a recipe I have found online and tweaked a little to make it my own. Everyone who tries these cookies loves them! They are crunchy around the edges and chewy and soft in the centre. I make these literally once a week, naughty I know but they are usually the only treat we have in the house. Definitely give them a go! They only take about 10 minutes to prep and then 15-20 minutes cooking time depending on the size you roll them. Enjoy!

Ingredients

  • 125g unsalted butter, melted
  • 1 cup brown sugar
  • Just under ¼ cup caster sugar (you can do the full ¼ if you like – I find it makes them a touch too sweet though)
  • 1 tsp vanilla (I use Vanilla bean paste but you can use essence or extract)
  • 1 large egg
  • 1 cup Plain flour
  • ¾ cup Self Raising flour
  • 1 tsp baking powder
  • 1 cup milk chocolate chips (I use Cadbury Milk Chocolate chips and feel they are the best!)

Method

Pre-heat oven to 160°C and line 2 baking trays with baking paper. Place melted butter, both sugars and vanilla into a medium sized bowl and mix until well combined. Add both flours and baking powder (no need to sift) and mix gently just until the flour is incorporated well into the wet ingredients (do not over-mix as this leads to tough cookies). Add chocolate chips and work them into the dough with your hands, stop as soon as the chocolate is evenly distributed so as to not over-work the dough. Roll into balls and place onto baking tray, then press them down with your hand to flatten. Place into oven and let bake for about 5 minutes. Once you see the cookies rising, grab a fork and gently knock the air out of the cookies – this stops the cookies from rising too much and becoming doughy. Bake for a further 10 – 15 minutes or until the edges of the cookies become golden (keep a close eye on them so they don’t overcook and become crunchy. If the whole cookie is golden, you’ve left them too long) and remove from oven. Let cool completely on tray (this is so that the cookie can continue to cook slightly from the heat of the tray). Store in an airtight container for up to 3 days – if they last that long! Enjoy!

Tip: For even chewier cookies, make them larger (I use about 2-3 tablespoons of dough per cookie for large cookies – usually only fitting 6 per tray as a size comparison for you!)

Variations:

  • You can also make triple choc chip cookies by adding 1/3 white choc chips, 1/3 dark choc chips and 1/3 milk choc chips instead of all milk choc.
  • Add nuts for a different twist. To do so, just replace half of the choc chips with half a cup of the nuts of your choice (Hint: White choc and macadamia are always a winner in this house)
  • To make these even more chocolatey, you can add 3 tbsp cocoa when you add the flour to make the cookie itself chocolate as well!

“Healthy” Banana Bread Recipe

Hello my lovelies!

I decided to try a new recipe and thought I’d document the process and share the recipe with y’all. After searching many websites for a “healthy” banana bread recipe this is what I decided to go with. I did alter it a little bit though as I didn’t have one of the ingredients on hand (well, I couldn’t find it anyway. What’s the bet I find it tomorrow haha). There are probably healthier banana bread recipes out there but this is the one that sounded best to me and it was pretty simple too. It also had a 5 star rating on taste.com.au by over 500 members so I figured it must be pretty dang good. Hunter seemed to like it too which is a huge bonus! Now, I want to mention something even though it may be pretty obvious, this is a very “bready” recipe. This may sound silly, but all the banana bread recipes I’ve ever used have always turned out more like a banana cake. This one is definitely bread. It’s also not overly sweet, which is good for little ones. My bananas weren’t as ripe as they should be so that altered the taste, however it’s still nice. So if you want to use just ripe bananas rather than over ripe ones to reduce the sugar content then go for it! Now, without further ado, here is the recipe…

“Healthy” Banana Bread

What you will need…

itm

  • 1 ¾ cups Self-Raising Flour
  • ¼ cup plain (or All Purpose) Flour
  • 1 tsp cinnamon (I didn’t have any so I used about ½ tsp Mixed Spice instead)
  • 2/3 cup firmly packed brown sugar
  • ½ cup milk
  • 2 eggs
  • 1/2 tsp vanilla extract (this is optional & wasn’t in the original recipe, but I put vanilla in almost all of my baking)
  • 50g butter, melted & cooled
  • 2 over ripe bananas
  • 1 large & 1 medium sized mixing bowl
  • Loaf tin
  • Grease proof paper

Preheat your oven to 180°C/360F. Grease and line your loaf tin, allow for extra paper to go over the edges so you can easily remove your bread once it’s baked. Place flours, sugar and spice into the large mixing bowl, stir to combine. Once combined, create a well in the center.

ftm

Place milk, butter, eggs, banana and vanilla (if using) into a medium bowl and stir until well combined.

etm

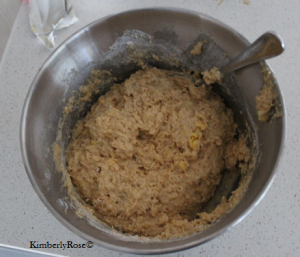
Pour the banana mixture into the well in your flour mix and stir until just combined, take care not to over mix as over mixing will result in tough bread.

mtmmmtm

Spoon mixture into prepared loaf tin and smooth over top.

ltm

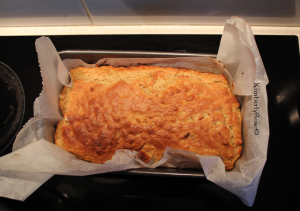
Place into oven to bake for 40-50 minutes or until golden on top and cooked through. Remove from oven and allow to cool in tin for 5 minutes before transferring to a wire rack to cool completely.

btm

Once cooled, cut banana bread into slices & serve. This is best served warm with butter. If you want to be naughty, it is delicious with a tiny drizzle of golden syrup.

fptm

Store in an airtight container for up to 3 days. Alternatively, freeze slices in an airtight container for up to 1 month.

If you decide to make this please share your pics with me on my social media! Links are in the sidebar.

Enjoy! x

Passionfruit Slice

Hello my lovelies! It has been SO long since I posted anything on here and I am so sorry! If you follow my Facebook and YouTube you would know Hunter has had some stuff going on so it has been a very emotional and stressful few weeks. I will post a blog about it in the coming weeks once we know more, but if you’d like to see the update, you can find it on my YouTube channel and Facebook page (links are in the sidebar). I thought what better way to jump back in to blogging than to share a new recipe that I LOVE and it is so simple to make. I found this recipe on Taste.com.au last week and decided to make it this afternoon. I have listed the recipe below! Feel free to share. Enjoy…x


Ingredients

Melted butter, to grease

150g (1 cup) self-raising flour

85g (1 cup) desiccated coconut

100g (1/2 cup) caster sugar

100g butter, melted

1 x 395g can sweetened condensed milk

125ml (1/2 cup) fresh lemon juice

2 tablespoons passionfruit pulp


Method

Step 1

Preheat oven to 180°C. Brush a 16 x 26cm (base measurement) slab pan with melted butter to lightly grease. Line the base and 2 long sides with non-stick baking paper, allowing the sides to overhang.


Step 2

Use a wooden spoon to combine the flour, coconut, sugar and butter in a large bowl. Use your hands to bring the dough together in the bowl. Transfer to the prepared pan. Use a metal spoon to press firmly over the base. Bake for 12 minutes or until light golden. Set aside to cool.


Step 3

Reduce oven temperature to 150°C.Use a balloon whisk to whisk together the condensed milk, lemon juice and passionfruit pulp in a large bowl until smooth and well combined. Pour into the pan and spread evenly over the base. Bake in oven for 15 minutes until just firm to the touch. Set aside to cool completely. Cut into slices to serve.

Notes: I used 1 lemon and 3 passionfruit for this recipe.


Kimberly x